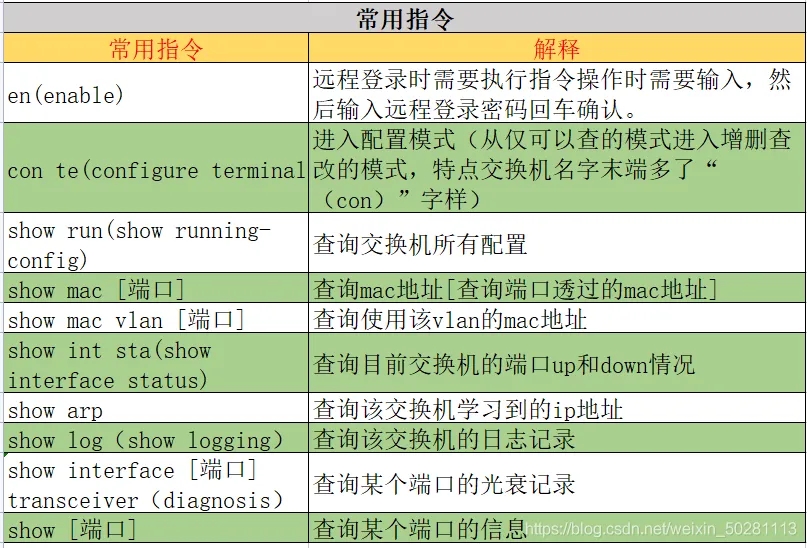
华为USG防火墙配置命令
常用命令
<SRG>     //用户视图,用户视图只能使用查看命令
<SRG>?  //查看用户视图下的所有命令
<SRG>display version  //查看VRP系统版本
<SRG>system-view   //进入系统视图
[SRG]sysname R1         //修改设备名称为R1
[R1]display clock  //查看系统时间
[R1]quit  //返回上一级
<SRG>save       //保存配置
<SRG>display saved-configuration     //查看保存的配置
<SRG>display current-configuration  //查看当前运行的配置
<SRG>reboot   //重启设备
<USG6000>reset saved-configuration    //恢复出厂配置
查看license信息及esn码
[USG6000]display license //查看license信息
[USG6000]display esn  //查看esn码
查看接口IP信息
[USG6000]display ip interface brief    //查看接口IP简要信息
[USG6000]display current-configuration interface GigabitEthernet 1/0/0 //查看该接口的运行信息
设置接口IP地址
[SRG]interface GigabitEthernet 0/0/0  //进入接口模式
[SRG-GigabitEthernet0/0/0]ip address 10.10.10.11 24         //24为子网掩码
[SRG-GigabitEthernet0/0/0]shutdown         //禁用接口
[SRG-GigabitEthernet0/0/0]undo shutdown    //启用接口
[SRG-GigabitEthernet0/0/0]display this  //查看该接口信息
设置vlan1管理地址,并允许ssh及https访问
[USG6000]interface Vlanif 1
[USG6000-Vlanif1]ip address 192.168.80.100 24
[USG6000-Vlanif1]service-manage ssh permit
[USG6000-Vlanif1]service-manage https permit
[USG6000-Vlanif1]service-manage ping permit        //注意这种方式会导致策略不生效
[USG6000-Vlanif1]undo service-manage enable        //必须关闭服务管理,策略才生效
设置静态默认路由
[USG6000]ip route-static 0.0.0.0 0.0.0.0 192.168.80.1
设置旗标和登录成功后提示
[SRG]header login information "zhuhai huanao zaixianjianceshi usg2000"
[SRG]header shell information "Wecome to Huawei USG2000"
设置时区及日期
<R1>clock timezone beijin add 08:00  //设置时区为北京东八区
<R1>clock datetime 11:20:10 2021/02/03  //11点20分10秒,2021年02月03日
设置console口密码及超时时间
[SRG]user-interface console 0  //进入console口配置模式
[SRG-ui-console0]authentication-mode password cipher huawei@123    //设置密码为huawei@123
[SRG-ui-console0]idle-timeout 20  //设置超时时间为20分钟
设置console口使用用户名密码登录(usg2000)
[SRG]user-interface console 0
[SRG-ui-console0]authentication-mode aaa    //认证模式为AAA
[SRG]aaa  //进入AAA配置模式
[SRG-aaa]local-user chb password cipher huawei@123  //创建chb用户名,密码为huawei@123
[SRG-aaa]local-user chb service-type terminal   //指定chb用户的类型为console口用
[SRG-aaa]local-user chb level 15  //指定chb用户的权限等级为15(15表示最高权限)
[SRG-aaa]display local-user  //查看本地用户
创建AAA用户管理console口,ssh,web
[USG6000]aaa //进入AAA配置模式
[USG6000-aaa]manager-user chbadmin   //创建用户chbadmin
[USG6000-aaa-manager-user-chbadmin]password cipher huawei@123    //设置密码为huawei@123
[USG6000-aaa-manager-user-chbadmin]service-type terminal ssh web    //指定为console,ssh,web用
[USG6000-aaa-manager-user-chbadmin]level 15  //设置级别为15,数值越大权限越高,15是最高权限
web登录配置管理
1. 配置USG的IP地址(略)
2. 配置UGS接口Web设备管理
[SRG-GigabitEthernet0/0/0]service-manage enable        //默认已开启
[SRG-GigabitEthernet0/0/0]service-manage https permit     //允许https,也可以设置允许Ping
3. 启动web管理功能
[SRG]web-manager enable
[SRG]web-manager security enable port 8443
[SRG]web-manager timeout 60    //设置超时时间为60分钟
telnet登录配置管理
1. 开启telnet服务
[SRG]telnet server enable
2. 配置USG接口telnet设备管理
[SRG-GigabitEthernet0/0/0]service-manage enable
[SRG-GigabitEthernet0/0/0]service-manage telnet permit    //设置接口允许telnet
[SRG-GigabitEthernet0/0/0]service-manage ping permit      //设置接口允许ping
3. 配置vty 并设置密码登录(或者参照下一条使用用户密码登录)
[SRG]user-interface vty 0 4       //进入vty配置模式
[SRG-ui-vty0-4]protocol inbound telnet    //配置vty允许telnet
[SRG-ui-vty0-4]authentication-mode password cipher huawei@123   //设置认证模式为密码
[SRG-ui-vty0-4]user privilege level 3   //设置权限级别为3
4. 配置vty并设置用户名密码登录即AAA认证
[USG6000]user-interface vty 0 4
[USG6000-ui-vty0-4]protocol inbound telnet
[USG6000-ui-vty0-4]authentication-mode aaa     //设置认证模式为AAA
[USG6000-ui-vty0-4]idle-timeout 60      //设置超时时间60分钟

[USG6000]aaa          //进入AAA配置
[USG6000-aaa]manager-user telchb     //创建用户telchb
[USG6000-aaa-manager-user-telchb]password cipher huawei@123    //设置密码为huawei@123
[USG6000-aaa-manager-user-telchb]service-type telnet         //设置服务类型为telnet
[USG6000-aaa-manager-user-telchb]level 3       //设置级别为3
通过SSH方式登录管理
1. 启用Stelnet服务
[SRG]stelnet server enable
2. 配置防火墙管理接口允许SSH管理
[SRG-GigabitEthernet0/0/0]service-manage enable
[SRG-GigabitEthernet0/0/0]service-manage ssh permit
3. 配置RSA本地密钥对
[SRG]rsa local-key-pair create
4. 配置vty线路
[SRG]user-interface vty 0 4
[SRG-ui-vty0-4]authentication-mode aaa
[SRG-ui-vty0-4]protocol inbound ssh   //允许ssh
[SRG-ui-vty0-4]idle-timeout 60    //设置超时时间为60分钟
5. 配置ssh登录用户名密码
[SRG]ssh user chbssh
[SRG]ssh user chbssh authentication-type password
[SRG]ssh user chbssh service-type stelnet

[SRG]aaa
[SRG-aaa]local-user chbssh password cipher huawei@123
[SRG-aaa]local-user chbssh service-type ssh

[SRG-aaa]local-user chbssh level 3
文件管理
<SRG>dir  //查看当前目录文件
<SRG>copy private-data.txt 123.txt  //复制private-data.txt到当前目录并改名为123.txt
<SRG>move 123.txt 111.txt        //移动123.txt到当前目录并改名为111.txt
<SRG>delete 111.txt   //删除111.txt,并非彻底删除可以恢复
<SRG>dir /all   //查看当前目录所有文件
<SRG>undelete 111.txt   //恢复刚才删除的文件111.txt
<SRG>delete /unreserved 111.txt   //彻底删除111.txt
<SRG>mkdir flash:/backup   //在根目录下创建文件夹backup
<SRG>cd backup   //切换目录到backup文件夹中
<SRG>pwd  //查看当前路径
<SRG>cd /   //切换到根目录
<SRG>copy private-data.txt flash:/backup/private-data-bak.txt //复制文件到指定路径
<SRG>move private-data.txt flash:/private-data.txt  //移动文件到指定路径
将flash中的文件备份到TFTP和FTP
#将flash中的vrpcfg.zip上传到tftp服务器
<R1>tftp 192.168.10.11 put flash:/vrpcfg.zip

#将tftp服务器的vrpcfg2.zip下载到flash中
<R1>tftp 192.168.10.11 get vrpcfg2.zip flash:/vrpcfg2.zip

<R1>ftp 192.168.10.11 21  //登录ftp服务器端口号21
输入用户名
输入密码
[R1-ftp]get 111.txt 111.txt   //下载ftp中的111.txt到flash中
[R1-ftp]put vrpcfg.zip vrpcfg-bak.zip  //上传flash中的vrpcfg.zip到ftp中
设置系统启动使用的文件及配置文件
<SRG>display startup    //查看系统启动使用的系统文件和配置文件
<SRG>startup system-software filename1.zip  //设置系统启动文件
<SRG>startup saved-configuration vrpcfg2.zip  //指定保存配置的文件
将防火墙设置为ftp服务器
需设置防火墙规则允许(略)
[USG6000]ftp server enable   //开启ftp服务

[USG6000]aaa
[USG6000-aaa]manager-user ftpchb
[USG6000-aaa-manager-user-ftpchb]password cipher huawei@123
[USG6000-aaa-manager-user-ftpchb]service-type ftp      //指定服务类型为ftp
[USG6000-aaa-manager-user-ftpchb]ftp-directory hda1:     //指定ftp的根目录为hda1
[USG6000-aaa-manager-user-ftpchb]level 3

[USG6000]undo ftp server    //关闭ftp服务
安全区域设置并将接口划入该区域
[USG6000]firewall zone untrust     //进入untrust区域配置
[USG6000-zone-untrust]add interface GigabitEthernet 1/0/0   //将该接口加入到该区域
[USG6000-zone-untrust]display this    //查看该区域的配置信息

[USG6000]firewall zone trust
[USG6000-zone-trust]add interface Vlanif 1     //将vlan1接口划入该区域

[USG6000]firewall zone name Inbound     //创建区域Inbound ,并进入该区域配置
[USG6000-zone-Inbound]set priority 90  //设置优先级为90,数值越大信任级别越高
[USG6000-zone-Inbound]add interface GigabitEthernet 1/0/5    //将该接口加入到该区域

[USG6000]display zone  //查看区域信息
配置安全策略
[USG6000]security-policy //进入安全策略配置
[USG6000-policy-security]default action deny    //设置默认策略为禁止
[USG6000-policy-security]rule name SUL02 //新建一条规则名称是SUL02
[USG6000-policy-security-rule-SUL02]source-zone untrust  //源区域是untrust
[USG6000-policy-security-rule-SUL02]destination-zone local  //目标区域是local
[USG6000-policy-security-rule-SUL02]action permit   //动作是允许

[USG6000]display security-policy rule all //查看所有安全策略条目名称

[USG6000]display security-policy rule name SUL02 //查看SUL02这条安全策略

[USG6000]interface GigabitEthernet 1/0/1  //进入该接口模式
[USG6000-GigabitEthernet1/0/0]undo service-manage enable  //关闭服务管理,才能使安全策略生效
配置安全策略示例
[USG6000]security-policy
[USG6000-policy-security]rule name UT02    //新建一个规则名称叫UT02
[USG6000-policy-security-rule-UT02]source-address 192.168.10.12 32
[USG6000-policy-security-rule-UT02]source-address 192.168.11.0 0.0.0.255   //使用反掩码表示地址范围,即192.168.11.0/24这个网段
[USG6000-policy-security-rule-UT02]source-address range 192.168.12.1 192.168.12.50     //指定地址范围在192.168.12.1~192.168.12.50
[USG6000-policy-security-rule-UT02]destination-address any     //目标地址是any,表示所有地址
[USG6000-policy-security-rule-UT02]user any    //用户是所有用户,这条命令是默认的,可以省略
[USG6000-policy-security-rule-UT02]service protocol  tcp destination-port 22    //指定目标端口是TCP的22号端口
[USG6000-policy-security-rule-UT02]service protocol udp destination-port 888    //指定目标端口是UDP的888端口
[USG6000-policy-security-rule-UT02]service protocol  icmp    //允许ping
[USG6000-policy-security-rule-UT02]service protocol icmp icmp-type echo-reply   //上一条命令包含这条命令,这个表示只允许icmp的回显包

[USG6000-policy-security]undo rule name UT02    //删除UT02这条规则
[USG6000-policy-security]display this     //查看规则内容
使用地址组,服务组,时间组的方式配置安全策略
创建相应的地址组
[USG6000]ip address-set A01 type object    //创建对象A01
[USG6000-object-address-set-A01]address 192.168.11.0 0.0.0.255    //添加地址范围,注意是反掩码写法
[USG6000-object-address-set-A01]address 192.168.12.0 0.0.0.255

[USG6000]ip address-set A02 type object      //创建对象A02
[USG6000-object-address-set-A02]address 192.168.20.0 0.0.0.255
[USG6000-object-address-set-A02]address 192.168.21.0 0.0.0.255

[USG6000]ip address-set A type group     //创建组A
[USG6000-group-address-set-A]address address-set A01   //添加对象A01
[USG6000-group-address-set-A]address address-set A02
[USG6000-group-address-set-A]address 192.168.3.0 0.0.0.255    //也可以在组里面,直接添加地址范围

[USG6000]display ip address-set all     //查看地址组
[USG6000]display ip address-set verbose A01 item    //查看地址组A01详细
[USG6000]display ip address-set verbose A item
创建相应的服务组
[USG6000]ip service-set S01 type object     //创建服务对象S01
[USG6000-object-service-set-S01]service protocol tcp destination-port 80    //添加目的地址端口为TCP的80
[USG6000-object-service-set-S01]service protocol tcp destination-port 22

[USG6000]ip service-set S02 type object
[USG6000-object-service-set-S02]service protocol tcp destination-port 8080
[USG6000-object-service-set-S02]service protocol tcp destination-port 8081

[USG6000]ip service-set S type group     //创建服务组
[USG6000-group-service-set-S]service service-set S01   //添加服务对象S01
[USG6000-group-service-set-S]service service-set S02

[USG6000]display ip service-set all      //查看服务组
[USG6000]display ip service-set verbose S01 item    //查看服务组S01详细
[USG6000]display ip service-set verbose S item
创建相应的时间组
[USG6000]time-range T      //创建时间组T
[USG6000-time-range-T]period-range 08:00:00 to 18:00:00 working-day    //设置周期时间为,工作日为周一到周五的8点到18点
[USG6000-time-range-T]absolute-range 08:00:00 2021/04/02 to 18:00:00 2020/12/30    //设置绝对时间
[USG6000-time-range-T]undo absolute-range all       //删除上一条命令
[USG6000-time-range-T]display this
配置安全策略时使用刚才创建的组
[USG6000]security-policy
[USG6000-policy-security]rule name UT03    //创建或者是进入条目UT03编辑
[USG6000-policy-security-rule-UT03]service S     //指定服务组为S
[USG6000-policy-security-rule-UT03]destination-address address-set A    //指定目标地址为地址组A

[USG6000-policy-security-rule-UT03]time-range T    //设置时间组为T
[USG6000-policy-security-rule-UT03]undo time-range    //删除上一条命令

[USG6000-policy-security-rule-UT03]action permit      //动作允许
查看路由及设置默认路由
[USG6000]ip route-static 0.0.0.0 0.0.0.0 172.16.10.3 //设置默认路由
[USG6000]undo ip route-static 0.0.0.0 0.0.0.0 //删除上一条命令
[USG6000]ip route-static 0.0.0.0 0.0.0.0 GigabitEthernet 1/0/0 172.16.10.3     //设置默认路由,并指定出去的接口

[USG6000]display ip routing-table     //查看路由表
设置接口为交换口
[USG6000]interface GigabitEthernet 1/0/1  //进入接口模式
[USG6000-GigabitEthernet1/0/1]portswitch  //设置接口为交换口
[USG6000-GigabitEthernet1/0/1]port link-type access   //设置接口类型为接入接口
[USG6000-GigabitEthernet1/0/1]undo portswitch   //取消上一条命令,即接口恢复为路由口
查看防火墙会话表
[USG6000]display firewall session table //查看会话表简要信息
[USG6000]display firewall session table verbose //查看会话表详细信息
[USG6000]display firewall server-map //查看server-map信息
将ASPF检测FTP流量的端口改为其他端口
防火墙默认是开启ASPF检测的,针对多协议服务,如FTP服务,ASPF会针对FTP服务临时开放安全策略
[USG6000]acl 2001 //创建ACL编号2001
[USG6000-acl-basic-2001]rule permit source 10.21.50.10 0.0.0.0  //允许该源地址
[USG6000]port-mapping FTP port 2121 acl 2001 //将关于ASFP检测的FTP服务转移到2121端口,ACL条目是2001
[USG6000]undo firewall detect ftp   //关闭aspf检测ftp浏览
番外:SSH方式连接华为USG2000防火墙报错
SecureCRT使用SSH方式连接华为USG2000防火墙报错如下:
The client has disconnected from the server. Reason:
Message Authentication Code did not verify (packet #4). Data integrity has been
compromised.
解决方法:
改为使用SSH1协议登录即可
通过telnet该地址的22端口可以看出SSH使用的版本是1.9
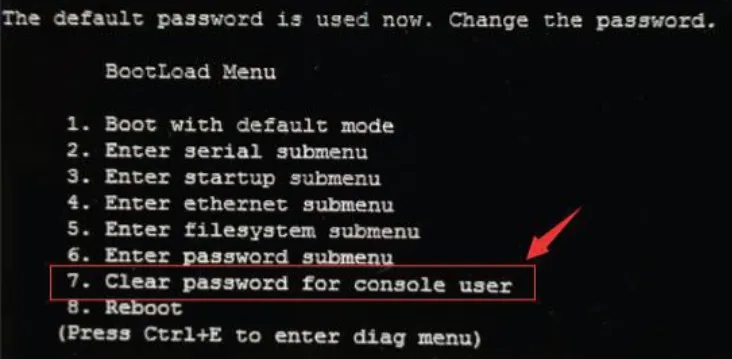
华为USG防火墙重置密码
以下操作会初始化华为USG防火墙,所有配置清空哦
通电情况下,用圆珠笔按住reset按钮10秒,笔记本接好console口,等待画面,出现提示按ctrl+B,输入默认密码O&m15213 然后选择对应的数字“Reset Factory Configuration”,返回后选择数字1,启动系统,然后输入默认的用户名admin,默认密码Admin@123 网页登录地址是https://192.168.0.1:8443 用户名密码也是admin和Admin@123


![[无线企业路由器] NAPT实现与三层交换机对接](https://blog-jc67-cn.oss-cn-beijing.aliyuncs.com/Images/2020-06-07/M27bXirpsx.png)


 贵公网安备:52010302001392号